
 In an earlier post, I outlined my plan for building a Linux Box. Here I will post how that plan was ultimately implemented. Life has taught me that all good planning is ultimately undone, and at some point, you must improvise. That has also proven true for this quest to up grade my computation. Specifically:
- After ordering all the hardware, it came to me that it was dumb to attempt to reuse my old semi-reliable, slow CD drive. So I purchase the HP 24X Multiformat DVD/CD Writer (dvd1260i) at Best Buy for 40 dollars.
- I discovered that the my old PC had ATA hard drives (commonly called an IDE drive) and my new Mobo only supports SATA (SATA 3Gb/s & 6GB/s and it includes an external eSATA port). This blows my plan to reuse my existing hard drives ... stupid me, I should have checked. I did a quick scan for ATA controller cards and found a few (not many) for 15 to 30 dollars. I could buy the card and make this work but it doesn't seem like a good investment. The drives are 400G drives and has a maximum data transfer rate of about 133MB/s (i.e. ATA/66). The maximum data transfer rates of SATA II and SATA III are 300 MB/s and 600 MB/s, respectively. I can buy a Seagate - Barracuda 500GB SATA II Internal Hard Drive for $70. Given my objective to increase the performance of my computing experience, buying a new SATA III hard drive should have been part of the original plan.
- After reading up on RAID and the Intel Rapid Storage Technology (RST), I concluded that it would be best to do a Software Raid and not use RST.
- While I assumed in my original plan that I would dual boot the box with Linux and MS Windows, the comment from [email protected] convinced me of what I suspected I should do; and that was to make wine, mono, and PlayOnLinux work for me. While I haven't stressed them, so far so good. I have not installed VirtualBox and I suspect I will not ... unless I get desperate.
- I was planning to reuse my old keyboard and mouse, but you know, I hated that keyboard and the mouse was already acting badly and about to die on me. So I ended up replacing them with sometime worthy of my new system.
Configuring Ubuntu
You'll find many recommendations on how to jazz up a newlly install Ubuntu system. I found some of these suggestions useful:Installing "dot" Files
Like may, over the years I have made a large time investment in tuning my.bashrc, .vimrc, and other such resource files. I installed my beloved "dot" files from my Git repository.
Installing Google Chromium and Chrome
Chromium is a fully open-source version of Google's Chrome, and for licensing reasons, it doesn't come packaged with the integrated Flash or a native PDF reader. Lucky, there is a work around and that is documented here: Use Google Chrome’s Native PDF reader in Chromium.But I prefer Chrome to Chromium, and luckily, you can install it on Ubuntu. Just go to Chrome's download site and follow the instructions.
Installing My Squeeze Box
I have a SqueezeBox device in my workshop for playing music. Specifically, I have the Squeezebox Classic (Owner's Guide). On my old PC, I had installed the SlimServer which would provide the music stream. I want to now reestablish that capability on the Linux box. The post How to Use Squeezebox With Ubuntu and the Logitech SqueezeBox Wiki gives you all the information you should need.
The Ubuntu (Debian) software for the SqueezeCenter or now called the Logitech Media Server (formerly known as SlimServer) is maintained by Logitech, and therefore, will not be installed via get-apt. To make it part of the package resource list (used to locate archives of the package distribution system in use on the system), you need to update the /etc/apt/sources.list file. To do this, do the following:
sudo vim /etc/apt/sources.list
Scroll to the bottom of the file and enter the following information and then save:
# This software is not part of Ubuntu, but is offered by Logitech for the
# Logitech Media Server (formerly known as SqueezeCenter or SlimServer).
deb http://debian.slimdevices.com stable main
Now do the following:
sudo apt-get remove --purge logitechmediaserver
sudo apt-get update
sudo apt-get install logitechmediaserver
Now open a browser and type "http://desktop:9000" as the URL, where "desktop" is the name of your Linux system. This brings you to a Squeezebox interface to configure the system.
If you want to start/stop Logitech Media Server manually you can run:
sudo /etc/init.d/logitechmediaserver stop,
sudo /etc/init.d/logitechmediaserver start,
and
sudo /etc/init.d/logitechmediaserver restart.
Keep in mind that the Squeeze Box Server uses port 9000.
Make sure the port is open with the following:
netstat -an | grep 9000.
If the you don't get any output or the line doesn't contain "LISTEN",
then the port is closed or there is no process (i.e squeezeboxserver) listening to it.
Use these procedures to open ports on a Linux firewall.
Note: Because of a bug (conflict with the version of Perl I'm using), I had to install a beta version directly using
# See http://forums.slimdevices.com/showthread.php?101237-Logitech-Media-Server-7-8-0-now-available!
# Download the Debian package from http://downloads.slimdevices.com/nightly/?ver=7.8
sudo dpkg -i logitechmediaserver_7.8.1~1411629722_all.deb
Someone at Logitech had the brilliant idea that MP3s and other audio files should be stored in an online service a while back, something that doesn't sit well with me, I prefer to keep them on my LAN. Consider this to roll your own Squeezebox with a Raspberry Pi.
Configuring Printers
Configuring Samsung SCX-4521F Printer/Scanner
When it comes to printers and scanners, Ubuntu advices that you should simply plug it in and try! Ubuntu claims that if it's a newer model USB scanner / printer, it is likely that it will work immediately without any further driver or software installations. I did this with my multifunction Samsung SCX-4521F, which is a printer / scanner combination, and the printer function worked but the scanner did not.
After a bit of research, I discovered that Ubuntu uses
Common UNIX Printing System (CUPS) for printer management.
CUPS is the standards-based,
open source printing system developed by Apple for OS X and other UNIX-like operating systems.
Assuming CUPS is installed (and it appeares to be with the Ubuntu package),
you can use a web browser to access it features.
To do this, open your web browser and got to http://localhost:631/.
You'll find there an overview of CUPS, administrative functions, and even command-line utilities.
I also discovered that SANE (Scanner Access Now Easy) is the Linux way of scanning. SANE supports a great many scanners, and the community around SANE adds support for more scanners all the time. They claim, by and large, you should simple plug them in and your ready to scan. However, some scanners, like mine, require more effort.
SANE isn't typically installed with the Ubuntu distribution, but you can install SANE via
sudo apt-get install sane xsane libsane-extras
SANE supplies a utility called
scanimage that is a command-line interface to control image acquisition
devices such as flatbed scanners or cameras.
When I ran it, I got the following results
$ scanimage --list-devices

No scanners were identified. If you were expecting something different,
check that the scanner is plugged in, turned on and detected by the
sane-find-scanner tool (if appropriate). Please read the documentation
which came with this software (README, FAQ, manpages).
Some more web research told me that my printer is a Xerox manufactured product and I needed to install the Samsung Unified Linux Driver. I did the repository setup and package install recommended at The Samsung Unified Linux Driver Repository. The install I did was
sudo apt-get install suld-driver-4.00.39 suld-configurator-2-qt4
I then added my login user to the scanner group via sudo usermod -a -G scanner jeff.
I ran the command sane-find-scanner to see if I'm now able to detect the scanner,
and I got the following disappointing results.
$ sudo sane-find-scanner

  # sane-find-scanner will now attempt to detect your scanner. If the
  # result is different from what you expected, first make sure your
  # scanner is powered up and properly connected to your computer.

  # No SCSI scanners found. If you expected something different, make sure that
  # you have loaded a kernel SCSI driver for your SCSI adapter.

could not fetch string descriptor: Pipe error
could not fetch string descriptor: Pipe error
  # No USB scanners found. If you expected something different, make sure that
  # you have loaded a kernel driver for your USB host controller and have setup
  # the USB system correctly. See man sane-usb for details.

  # Not checking for parallel port scanners.

  # Most Scanners connected to the parallel port or other proprietary ports
  # can't be detected by this program.
At this point, I did some back tracking and discovered the following article: How do I get the scanner to work on a Samsung SCX 4521F Multi function printer? The work already done above covers step 1 of this article and step 2 isn't relevant (since I can already print). I need to perform step 3, that is
sudo apt-get install samsungmfp-scanner
Now I re-ran the command scanimage --list-devices and got the following
$ scanimage --list-devices
device `smfp:SAMSUNG SCX-4x21 Series on USB:0' is a SAMSUNG SCX-4x21 Series on USB:0 Scanner
but the sudo sane-find-scanner got the same
"could not fetch string descriptor: Pipe error" error message when done earlier.
After some more research and using lsusb | grep Samsung and cat /lib/udev/rules.d/40-libsane.rules | grep 3419,
I discover there is no udev rule for the SCX-4521F scanner.
Therefore, I place the following lines in /lib/udev/rules.d/40-libsane.rules
# Samsung SCX-4521F
ATTRS{idVendor}=="04e8", ATTRS{idProduct}=="3419", ENV{libsane_matched}="yes"
This still didn't give me a good run for sudo sane-find-scanner
but the command scanimage --test did give passing results.
Given this, I proceeded to using xsane to test out some scanning (it worked!).
xsane is a X Window application and produces it output in PNM format.
You can convert this format to PDF (and many other formats) via the utility convert
(e.g. convert outfile.pnm outfile.pdf).
Configuring HP LaserJet P2035 for Google Cloud Printing
I later abandoned my Samsung printer for the HP LaserJet P2035; a basic black & white workhorse. Keeping the multipurpose Samsung working was just too much of a drain on my time.
To get this printer working, I choose to use it with Google Cloud Print. To do this, for the most part, I followed the post "How can I easily set up a Google Cloud Print printer?" to get my Linux box configured with the Google Cloud Print service. I then used "How can I import my printer(s) into Google Cloud Print?" to get my printer established within Google Cloud Print.
With Google Cloud Print, I'm not only able to print from my Linux desktop, but from any Chrome browser when I'm logged in to my Google account. So I can print from my Chromebook, Android Phone, etc. The next step was to share this print with others, and that can be done by following this posting: Share your printer.
iPod Support
Ubuntu comes with Rhythmbox as its music playing application and can be used to synch with a iPod. Also, you'll want to install several Rhythmbox plugins. That can be done via
sudo add-apt-repository ppa:fossfreedom/rhythmbox-plugins
sudo add-apt-repository ppa:phw/musicbrainz
sudo apt-get update
sudo apt-get install rhythmbox-plugin-complete
After installing any of the above Rhythmbox plugins, enable them from the main menu: Rhythmbox > Plugins.
Setting-Up Harmony Remote
I have the Logitech Harmony 650 Universal Remote Control for my home theater system. To program the device, it must be tethered to a web site via a Windows or Mac PC. The Harmony web site does reference some Linux support done by others. The posting "How to set up a Harmony remote using Linux" and "Logitech Harmony Universal Remote Linux Software Support" give you the basics of what you need to do. Within these sites you lean about the utilities concordance and congruity. The first utility provides most of the functionality of the Windows software provided by Logitech and the second is a GUI application for programming Logitech Harmony remote using concordance. To install these utilities, do the following:
sudo apt-get install concordance
sudo apt-get install congruity
You also have to configure the web browser to ask what to do with download links. It is best to use Firefox and you can configure downloads via: Edit->Preferences->General->Downloads->Always ask me where to save files.
Now plug the remote into the PC using the provided cable, and enter the command: sudo concordance -i -v. You should get a bunch of data and the word "Success", verifying that you can talk to the device.
Now go through the following process:
- Plug in the remote via the provided USB cable.
- Visit the Harmony Remote's member site URL. This appears to be a legacy support site and Logitech site listed in the documentation with the device will not work under Linux.
- Create an account or login into your existing account.
- Skip/ignore the “you need to update your software” steps, and eventually a download prompt appears.
- Choosing ‘open’ rather than ‘save’ impressively results in the Congruity graphical setup up launching.
- Step through the setup boxes as prompted.
Setting-Up Keyboard & Mouse
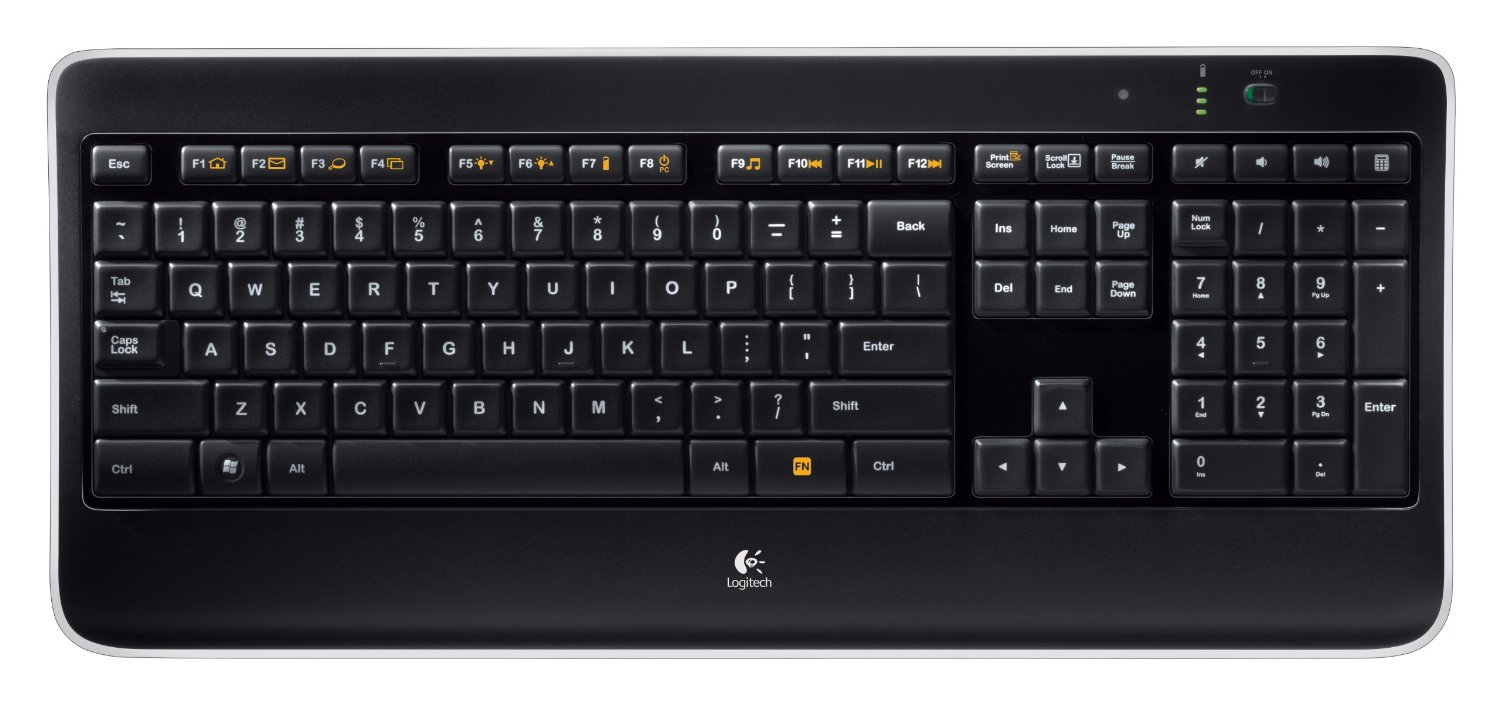 To improve my driving experience, I purchased the
Logitech Wireless Illuminated Keyboard K800
and the
Logitech M510 Wireless Mouse.
These devices use the Logitech Unifying wireless technology, which allows a single wireless receiver to connect with multiple Unifying devices. I plugged in the mouse's receiver and in short order the mouse was working.
To improve my driving experience, I purchased the
Logitech Wireless Illuminated Keyboard K800
and the
Logitech M510 Wireless Mouse.
These devices use the Logitech Unifying wireless technology, which allows a single wireless receiver to connect with multiple Unifying devices. I plugged in the mouse's receiver and in short order the mouse was working.
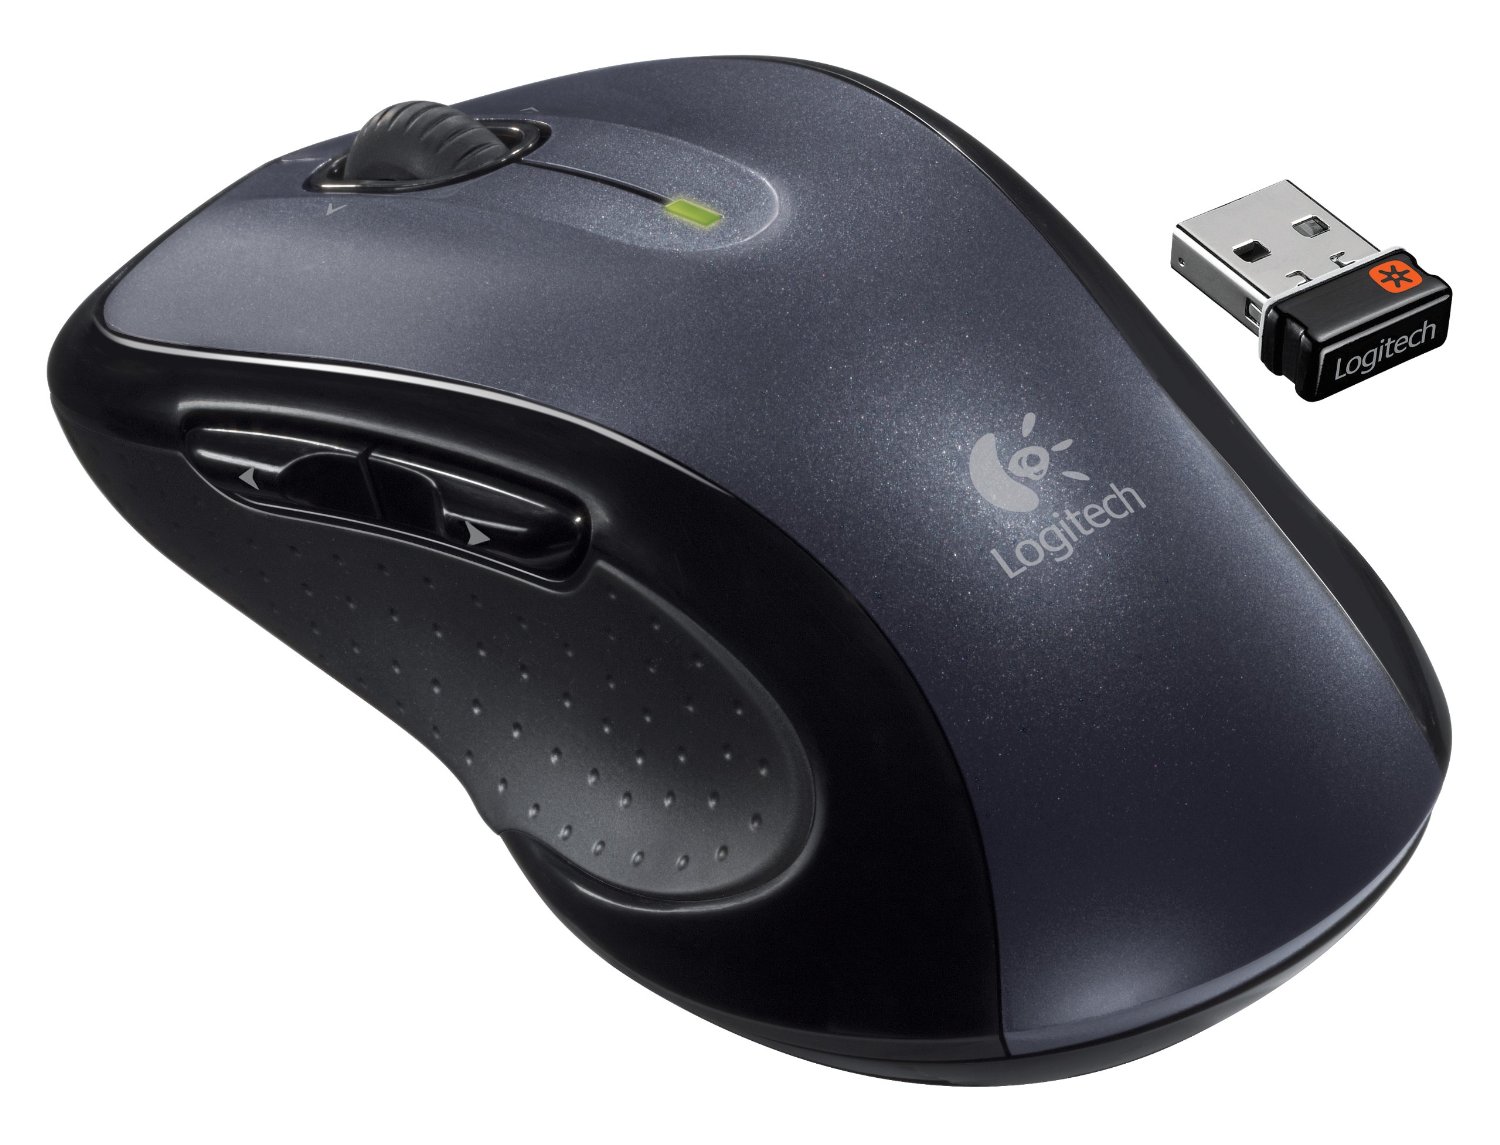 I was a bit concerned about the ability of the receiver to support multiple device (i.e. the keyboard) simultaneously under Linux.
Doing a quick search I found a post discussing how to do the device pairing under Linux. To install the
I was a bit concerned about the ability of the receiver to support multiple device (i.e. the keyboard) simultaneously under Linux.
Doing a quick search I found a post discussing how to do the device pairing under Linux. To install the ltunify pairing software, and do the pairing, do the following:
cd ~/src
git clone https://git.lekensteyn.nl/ltunify.git
cd ltunify
make install-home
- To list the devices that are paired:
sudo ltunify list - To pair a device:
sudo ltunify pair, then turn your wireless device off and on to start pairing. - To unpair a device:
sudo ltunify unpair mouse - To get help:
sudo ltunity --help
Mouse Xbindkeys
The M510 mouse has extra buttons on its left side and the scroll wheel has a side-to-side click, but out of the box,the don't do anything under Linux. It would be nice to make use of these extra buttons. To address this problem, I found pointers in these posts: How to get all those extra mouse buttons to work, How do I remap certain keys, Mouse shortcuts with xbindkeys, and Guide for setup Performance MX mouse on Linux (with KDE).
Basically, using Xbindkeys, I want to map the mouse buttons with desired actions. I want to setup the M510 mouse extra buttons as follows:
- Left-side Button: up mapped to Page Up and down mapped to Page Down
- Scroll Wheel: move left mapped to Copy and move right mapped to Paste
- Scroll Wheel: press mapped to Paste
xev prints the contents of X events by creating a window and then asks the X Server to send it events whenever anything happens to the window. It's sort of a keyboard and mouse events sniffer. If we know what event name the X Server gives to our buttons, then we can remap them. Using this program, we find out the following:
- Left-side Button: up is known by the X Server as button 9
- Left-side Button: down is known by the X Server as button 8
- Scroll Wheel: move left is known by the X Server as button 6
- Scroll Wheel: move right is known by the X Server as button 7
- Scroll Wheel: press is known by the X Server as button 2
Xbindkeys is is a X Windows program that enables us to bind commands to certain keys or key combinations on the keyboard and it will also work for the mouse. The file ~/.xbindkeysrc is what xbindkeys uses as a configuration file to link a command to a key/button on your keyboard/mouse. There is also xbindkeys_config is an easy to use gtk program for configuring xbindkeys. To install these tools, do the following:
sudo apt-get install xautomation xbindkeys xbindkeys-config
To create your initial xbindkeys configuration file, just run the following command:
xbindkeys --defaults > $HOME/.xbindkeysrc
The syntax of the contents of .xbindskesrc is simple and is illustrated below:
# short comment
    "command to start"
        associated key
The "command to start" is simply a shell command (that you can run from a terminal), and "associated key" is the key or button.
Now, using an editor, update the .xbindkeysrc file to include the following:
# Do a Page Down when mouse left-side down button is pressed
"xte 'key Page_Down'"
    b:8
# Do a Page Up when mouse left-side up button is pressed
"xte 'key Page_Up'"
    b:9
# Move scroll wheel to the left to copy text
"xte 'keydown Control_L' 'keydown Shift_L' 'key c' 'keyup Control_L' 'keyup Shift_L'"
    b:6
# Move scroll wheel to the right to paste text
"xte 'keydown Control_L' 'keydown Shift_L' 'key v' 'keyup Control_L' 'keyup Shift_L'"
    b:7
# Press scroll wheel to paste text
"xte 'keydown Control_L' 'keydown Shift_L' 'key v' 'keyup Control_L' 'keyup Shift_L'"
    b:2
To activate any modification of the .xbindkeysrc configuration file, your have to restart xbindkeys. This can be done via:
pkill xbindkeys
xbindkeys
Other useful resources are:
xteis a program that generates fake input using the XTest extensionxvkbdis a virtual (graphical) keyboard program for X Window System which provides facility to enter characters onto other X clients by clicking on a keyboard displayed on the screen.xbindkeys_showis a program to show the grabbing keys used in xbindkeysxmodmapis a utility for modifying keymaps and pointer button mappings in Xorg.
Moving from SplashID to KeePass
I have been using the MS Windows based SplashID to store passwords, credit cards, account numbers, etc. securely on my PC and cell phone. I got it to work under Wine but I'm considering Linux alternatives. I'm growing tired of purchasing SplashID licenses and the user interface looks like it was designed in the 1970's. I came across "Five Best Password Managers" which gave me the incentive to check out KeePass. KeePass is a cross platform, open source password manager. It is extendable via its plugin framework, where additional functionality can be added. It looks like I can use Dropbox and KeePassDroid to get the data on my cell phone. I found these sites useful to get the job done:sudo apt-get install keepass2 keepass2-doc
I then exported the contents of my SplashID database to a CSV file and imported it into keepass2. I set up the KeePass2 database within my Dropbox folder. This way, it can be scych'ed with my cell phone. I then installed KeePassDroid on my cell phone, pointing it at the database with the cell phones Dropbox. KeePassDroid is a port of the KeePass password safe for the Android platform.
There is some cleanup of the fields within the KeePass2 database, but the data is now accessable on both my PC and my cell phone.
Installing Slake Utility
Slack is a team collaboration tool that replaced email with a chat app that plugged in to all their favorite services like Twitter, GitHub, and Dropbox. It organize your team conversations in open channels. You can make a channel for a project, a topic, a team, etc. but transparent view of all that’s going on.
At the time of writing this post, Slake didn't have an offical tool for the Linux desktop, but ScudCloud provide the unofficial Slack client for Ubuntu. And it's open source.
To install the Slake client, and its spelling checker, do the following:
sudo apt-add-repository -y ppa:rael-gc/scudcloud
sudo apt-get update
sudo apt-get install scudcloud
sudo apt-get install hunspell-en-us
If you want to use a Slack icon instead of ScudCloud (which is not possible to include in this package due to copyright)
sudo dpkg-divert --add --rename --divert /opt/scudcloud/resources/scudcloud.png.real /opt/scudcloud/resources/scudcloud.png
sudo cp ~/scudcloud.png /opt/scudcloud/resources/
sudo chmod +r /opt/scudcloud/resources/scudcloud.png
Installing Wine
Wine allows you to run many Windows programs on Linux. Instead of simulating internal Windows logic like a virtual machine or emulator, Wine translates Windows API calls into Linux calls. I used the following to install Wine:
sudo add-apt-repository ppa:ubuntu-wine/ppa
sudo apt-get update
sudo apt-get install wine
Using Wine on Windows programs can be as simple or complex, it all depends on the program. Ubuntu provides some guidance on how to use Wine, also check out Wine Documentation and Wine HowTo.
At the time of writing of this post, the only thing I loaded via Wine was SplashID, which worked without any challenges.
Note: Ultimately, I abandoned Wine and installed VirtualBox. See my posting titled "Having Fun with Wine, VirtualBox, and TurboTax".
Installing PlayOnLinux
PlayOnLinux is based on Wine, and so profits from all its features, yet it keeps the user from having to deal with all its complexity. I also install this package, in part because it comes pre-configured to load some popular tools. I used it to install Internet Explore (sometimes its the only browser you can get to work on a site), and Kindle.
Installing RAID
RAID is an acronym for Redundant Array of Independent Disks and RAID as the first tier in your data protection strategy. It uses multiple hard disks storing the same data to protect against some degree of physical disk failure. The amount of protection it affords depends upon the type of RAID used. I'm not going to go into all the types of RAID, nor their benefits, but you can find much of this information, and much more, in the following links: In my case, I had an existing disk drive (non-RAID), loaded with data, and I wanted to add an additional drive to make it a RAID. This presents some challenges since you're attempting to preserve the data. In this regard, I found the following links helpful:/dev/sda1 and mounted as /boot. The currently installed 1TB SATA HDD has the device name of /dev/sdb1 and mounted as /home. The newly install 1TB SATA HDD has the device name of /dev/sdc.
Description of the procedures I used to create the RAID is as follows:
- Physically install the additional hard drive.
- Install mdadm, which is the Linux utility used to manage software RAID devices.
sudo apt-get install mdadm
- Partition the newly installed disk. Use the following inputs: n to establish a logic partition, p to make it a primary partition, 1 should be the partition number, use the same sectors as the currently installed drive, t to set the partition type, fd hex code type, p to print what the partition table will look like, w to write all of the changes to disk.
sudo fdisk /dev/sdc
- Create a single-disk RAID-1 array (aka degraded array) with the existing hard drive. (Note the "missing" keyword is specified as one of the devices. We are going to fill this missing device later with the new drive.)
sudo mdadm --create /dev/md0 --level=1 --raid-devices=2 missing /dev/sdc1
- At this point, if you do a
sudo fdisk -l | grep '^Disk', you see a new disk, that being/dev/md0. This is the RAID but not yet fully created. - Make the file system (ext3 type like the currently installed hard drive) on the RAID device.
sudo mkfs -t ext3 -j -L RAID-ONE /dev/md0
- Make a mount point for the RAID and mount the device.
sudo mkdir /mnt/raid1
sudo mount /dev/md0 /mnt/raid1</code></p>
- Copy over the files form the original hard drive to the new hard drive using rsync.
sudo rsync -avxHAXS --delete --progress /home/* /mnt/raid1
- Just in case of a disaster, copy the original hard drive to the SSD
/dev/sda1root file system as /home_backup.
sudo rsync -avxHAXS --delete --progress /home /home_backup
- After the copy, to see the status of the RAID, use the command
sudo mdadm --detail /dev/md0. What you see is that the/dev/sdc1drives is in "active sync " state but no reference to the other drive. When you docat /proc/mdstatyou see "md0 : active raid1 sdc1[1]" but again no reference to the other drive. - Edit your
/etc/fstabfile and edit all references of/dev/sdb1to/dev/md0and reboot the system. With this,/dev/md0will be used as/homeon the next boot. This will free up the existing hard drive so it can be made ready for the RAID. - With fdisk, re-partition /dev/sdb1 with a partition of type fd. Use the following inputs: n to establish a logic partition, p to make it a primary partition, 1 should be the partition number, use the same sectors as the currently installed drive, t to set the partition type, fd hex code type, p to print what the partition table will look like, w to write all of the changes to disk.
sudo fdisk /dev/sdb1
- Add
/dev/sdb1to your existing RAID array.
mdadm /dev/md0 --add /dev/sdb1
- The RAID array will now start to rebuild so that the two drives have the same data. Use the following command to check the status of the rebuild.
sudo mdadm -D /dev/md0
- For Ubuntu, it seems it is also necessary to update the
/etc/mdadm/mdadm.conffile. If this is not done, the RAID device will not be mounted when you reboot the system. The solution is to run the following command on your system, once the RAID drive has been configured:
sudo cp /etc/mdadm/mdadm.conf /etc/mdadm/mdadm.conf_backup
sudo mdadm --detail --scan >> /etc/mdadm/mdadm.conf